
Top 10 Secret Features of QuickTime Player You May Love
QuickTime Player is the media player software that comes with macOS. Its simple and straightforward user interface makes it the first choice for many users to play videos on Mac. However, in addition to playing video, QuickTime Player actually has a lot of useful features that can help you in critical moments.
All of the features mentioned below are available in the latest official version (version 10) of the macOS system, and anyone could get use of these features from the menu bar of QuickTime Player. Since the Windows version of QuickTime Player stopped updating as early as 2016, it is beyond the scope of this article.
> Part 1: Record anything: video, audio, screen
> Part 2: Simple video editing: cropping, audio detach, merging, rotating
> Part 3: Video compression: from 4K to 480P
> Part 4: Share your video quickly: upload videos directly to YouTube
> Part 5: Other secret features
Part 1: Record Anything: Video, Audio and Screen
QuickTime Player has a built-in recording tool that allows you to take advantage of your Mac camera like FaceTime HD, microphone, and even your camera and microphone on your iPhone/iPad devices. To do recordings, select "File" in the menu bar to see the three new recording options.
Recording video and audio with built-in camera and microphone
Select "New Video Recording" or "New Audio Recording" to see the recording interface as below. Click the red round button to start recording, and click the white square button to stop recording. If you want to record a speech video, it's better to use your Mac than your iPhone because you can record directly on the computer with the manuscript open and displayed on screen. Click the small arrow button next to the record button to change the recording settings. You can set the video and audio input device and the recording quality.
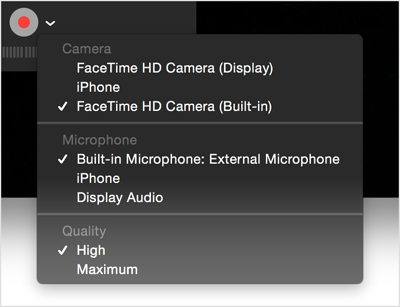
One thing to note is that if you are using a computer with a microphone for recording, remember to adjust the size of the external sound on the left side of the recording button to the lowest level to avoid echo generation.
System Audio Recording (Soundflower plugin required)
Many people have had this question: How do you record a voice chat or a remote conference by recording the audio of the system? That is what we call "internal recording." After some searching, you may find that the internal audio recording software for macOS is often very expensive. If you only have a temporary demand, this QuickTime Player plugin is what you want: Soundflower.
The principle is simple: By transferring the system sound to the virtual sound card, you can then select the virtual sound card as the audio input device to record directly in the QuickTime Player. To record system audio with QuickTime Player and Soundflower, do the following:
1. Set Soundflower as the system output device in the system preference settings, which means all system sounds will be sent to Soundflower.
2. Open QuickTime, create a new audio recording, and set the input device to Soundflower.
Tips: Soundflower's default volume is 50%. If you need to increase the volume, adjust it in the system's Midi audio settings. By the way, while recording, you can't hear anything, but it's recorded into QuickTime Player.
Recording Screen of macOS or iOS
To record screen with QuickTime Player for macOS, select "New Screen Recording" in QuickTime Player and configure the sound output options in the arrows next to the recording button. For example, if you need to use your own voice while recording, select the "Built-in microphone" option. So, you can record your own voice together with the screen.
After you start recording, a gray area will appear in the center of your Mac's screen. Follow the instructions to choose full-screen recording or selected area recording.
- Tap anywhere on the screen to start recording the entire screen.
- Drag to select the desired area, then click the Start Recording button.
To record your iOS device, you first need to meet the following criteria:
- Your macOS is Yosemite or higher
- iOS 8 or higher is installed on your Apple devices
- iOS device is connected to your Mac via Lightning cable
- In the "Do you trust this computer to read your device data" pop-up window on your iOS device, select "Trust"
Then select "New Movie Recording" and select your own iOS device in the recording options. After that, you can see that the iOS device's desktop appears on the screen and you can start recording.
Part 2: Easy Video Editing: Trimming, Splitting, Detaching, Merging, Rotating, etc.
How to Trim Video with QuickTime Player
After launching QuickTime Player, open the video or audio you want to trim, select "Edit > Trim" in the menu bar, a yellow trimming bar appears, with handles on each end.
![]()
Drag the handles to determine the part to keep. If you want to use the audio track to determine which areas need to be trimmed, you can select “View > Show Audio Track” to show the audio track of the video.
After clicking "Trim", all videos outside the yellow area will be deleted, so the trimming feature is suitable for quick editing of unwanted video and audio parts.
How to Split Video with QuickTime Player
What if I need to keep all parts of the video and adjust the order of the clips? This time, you can use the "Split" function of QuickTime Player.
To do so, first move the playhead to the position you need to cut the video, then select "Edit > "Split Clip", the video or audio will be split into two parts, then you can drag and change the order of the split clips.
![]()
How to Merge Video with QuickTime Player
If you want to add another video to the current video, you can choose Edit > Add Clip to End, and from the file dialog select the other movie you want to combine to the current video.
How to Rotate/Flip Video with QuickTime Player
This is a simple but very important feature. To rotate or flip a video in QuickTime Player, simply select the flip and rotate commands from the Edit menu. You can also use the shortcuts to rotate or flip a video quickly: SHIFT+COMMAND+L/R/H/V (short for Left, Right, Horizon and Vertical)
For more video editing features, iMovie is Apple's official video editing application for free, while Final Cut Pro X is the solution for professionals.
Part 3: Video compression: from 4K to 480P
Exported your recorded 4K video from the iPhone and found that the file size is too big? Never mind! QuickTime Player helps you reduce the resolution for compression fast and easy. No additional video compressor required. So directly open the video you need to compress with QuickTime Player, and then select "File > Export", in the dialog there are different resolutions for your choice (480p, 720p, 1080p, 4K), select your desired one and let it go. Here you can also easily extract audio from video using QuickTime Player.
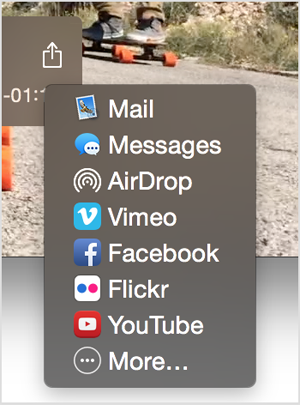
Part 4: Share your video quickly: upload videos directly to YouTube
Once you've finished editing your video, it's easy to share your video by Mail, Messages, AirDrop, YouTube, Facebook, Vimeo and other methods. Just go through File > Share or click the Share button and select the destination you want.
Part 5: Other Secret Features of QuickTime Player
View metadata of video
Choose Window > Movie Inspector to view metadata about the currently playing video, such as path, codec, sample rate, resolution, and more.
Play online video
If you have a link to a network video file on your hand, you don't need to download it. You can copy and paste it directly to File > Open Location to play it with QuickTime Player for Mac.
Add support for more video formats (Perian required)
QuickTime Player supports QuickTime movie files (.mov) by default, most MPEG files (.mp4, .m4v, .m4a, .mp3, .mpg), some AVI and WAV files, etc. So in some cases of .avi, .wmv, or .mkv, QuickTime Player will not play them because they have incompatible codec with QuickTime Player. Fortunately, you can make QuickTime Player support more video codecs by installing a QuickTime plugin called Perian.

iMovie for Windows | Download | Privacy Policy | Contact Us | iMovie Blog | Store |
Copyright ©
iMovie For Windows Dot Com. All rights reserved.
Browser compatibility : IE/Firefox/Chrome/Opera/Safari/Maxthon/Netscape