
Make Movies using iMovie for iOS on iPhone/iPad
I think everyone has used the mobile phone to shoot videos. Have you ever thought about making micro film with just one iPhone or iPad? It's also a good choice to turn your family photos and video clips into a special memory.
Every year, there are high quality video apps appearing in the App Store's annual selection list. These applications have the advantage of turning videos, photos, music and filters into a beautiful and fun short video. Most apps are easy to use. However, the disadvantages are also obvious, too few templates, amateur filters, limited video duration, etc. All of these make this type of applications lasting short time in the market. They can't really help creating high quality movies. Want to be the director of your own life but don't want to buy expensive equipment? Is there any good methods to make professional movies without raning out of your money?
iMovie and iPhone/iPad is the answer. If you already have an iPad or iPhone, you're only one-step away from a professional director! iMovie was originally developed for Mac computers and sold as part of the iLife suite. Later, iOS devices like iPhone 4 supported HD camera. Then iMovie for iOS came into life. Overall, iMovie has become an indispensable part of Mac and iOS. It's well known as its intuitive interface, streamlined design and Multi-Touch gestures, making video editing easier than before. If you haven't installed iMovie yet, download iMovie from iOS App Store. In this article, I'll teach you how to make movies on iOS devices step by ste.
For Windows Users: Download iMovie for Windows alternative
> Step 1: Create New iMovie Project> Step 2: Select Movie Theme
> Step 3: Import Media
> Step 4: Movie Making with iMovie for iOS
> Step 5: Applying Effects
> Step 6: Add Voiceover
> Step 7: Add Titles
> Step 8: Export Your Movie
Step 1: Create a new iMovie project
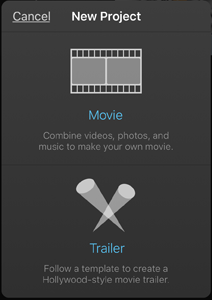
Open iMovie and you will be in the Projects browser. Tap + to start creating a new movie or trailer" and choose Movie or Trailor to create a project. Selecting "Movie" to create a movie project, in which you can assemble your existing photos and videos to a movie, while selecting "Trailer" to directly use the existing templates to quickly create a Hollywood-style trailor. You just need to input necessary information, add selected photos and video, and it's done. You'll get a professional-quality movie trailer with graphics and music matched. But if you want to customize more, choose to create a "Movie" project. Here, I take a movie project for example.
Step 2: Select Movie Theme
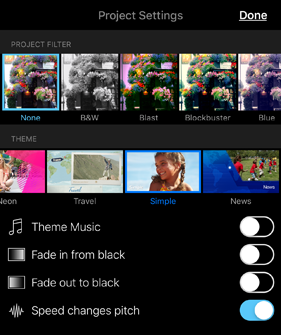
After creating a movie project, you will be asked to import photos and video from your media library. At last, tap Create Movie to complete. To choose a movie theme, tap the gear button at the bottom. In the resulting screen, go to the THEME part to select a desired theme. Each theme includes preset titles, transitions, and music. By default, the Simple Theme will be applied. But you can change it anytime. You can also switch on/off the theme music in the Project Settings screen.
Step 3: Import Media
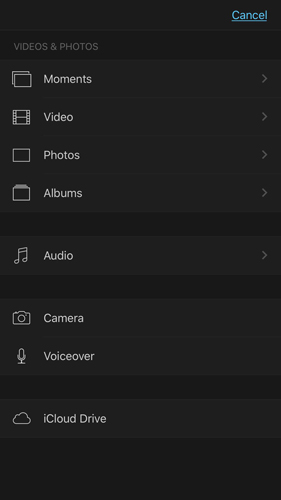
Tap the "+" button to the top left corner of the timeline to import videos and photos.
The video clips can be imported from instant camera recording, iCloud drive, iMovie media, Downloads, etc. If you want to add local videos recorded with non-iOS devices for iMovie, you need to first import them to iTunes. The imported video format must be MP4 or MOV. Therefore, videos taken by non-iOS device usually need video conversion to be imported.
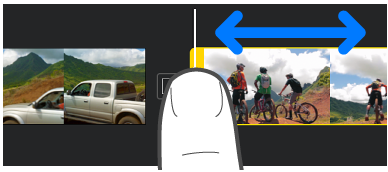
By default, the video will be imported with full length. If you only need to import specific segment, you can tap and drag the yellow handles in the the front and back ends of the video clip. And the extra part will be cut off automatically when importing.
iMovie presets dozens of sound effects and some theme music. If you want to use your personal songs, you could put the song files to the Music app that comes with your iOS device. iMovie for iOS can recognize them and import them without effort.
Regarding to photo import, simply tab it to add to your iMovie project. To preview it, touch and hold the photo in the media library until it appears in the pop-up viewer.
Step 4: Movie Making with iMovie for iOS
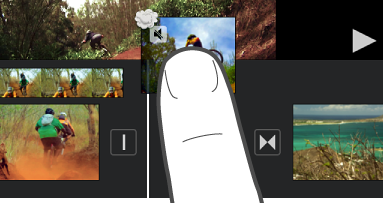
After the media files are successfully imported, you're able to find it in the timeline. The following are the four basic editing types. Generally, these editing methods are the same for videos, photos and audio.
4.1 Deleting a fragment
Touch and hold the video clip or photo in the timeline until it pops off the timeline, then drag it out of the timeline; when you see the puff of smoke in the corner of the clip, release it.
4.2 Moving clips
Press and hold the clip and drag it to the new location in the timeline.
4.3 Trimming clips
Tap to select the clip you want to trim in the timeline, and move the yellow handles of the clip to trim the video.
4.4 Splitting clips
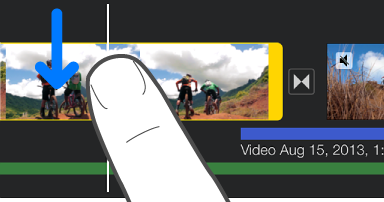
Drag the video clip to the position where you need to split, then tap to highlight it. You'll see 4 tools at the bottom: Split, Detach, Duplicate, and Delete. Select Split to split the video clip at the current position. Or you can swipe down over the playhead to split a clip.
4.5 Adding a freeze frame
The steps are the same as splitting the clip. Move the clip to the desired position of the playhead, then highlight the clip and tap the Speed icon at the button. There you can tap the Freeze option to add a freeze frame, which is set to 2 seconds by default. To change the length of freeze time, go the the Speed toolbox, tap to select a still frame, then drag any yellow handle to adjust the duration. Tap the Reset option to clear all freeze frames. In the editing screen, you're able to add a freeze frame by swiping up over the playhead.
Step 5: Applying Effects
In iMovie, the effects could be divided into three categories: Motion Effects(like Ken-Burns), Transition Effect and Filter Effects. Below are the detailed steps to apply there effect to make your movie more beautiful and professional.
5.1 Motion Effects
The motion effects in iMovie use the Ken Burns effect (slowly zooming out and zooming in). To add motion effects to your photo, touch the desired photo and the Ken Burns switch will show up on the image. Tap it to switch in on. Then you're able to pinch to position the start and the end. When doing the operation, be sure to think about which point of the photo you want to highlight, in order to determine the path of the Ken Burns effect. Tap the Play button to preview the Ben Burns effect.

5.2 Transition Effects
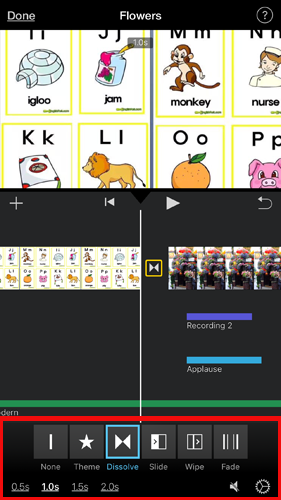
Between clips in the timeline, there will be a small button with a black square. This button is to set the transition between clips. Tap the transition button to show up all the possible transitions and the duration options. Currently, iMovie has 5 types of transition effects, including Theme (different depending on the selected theme for your movie), Dissolve, Slide, Wipe and Fade. In all, there are about 20 types of transitions in iMovie for iOS, which is very flexible and changeable. In addition, each transition effect can be set separately for the transition duration.
5.3 Filter Effects
iMovie's filter effects enable you to enhance or change the look of your clips, such as converting a color clip to black and white. You can add video filter effects to clips in your project or to the entire project. To apply filter effects to the entire project, tap the gear button and choose a project filter in the resulting screen. To add filter effect to your clips, tap the Filter button and select your favorite filter. You're able to preview the expected result of your clip in real time. Thus, it's very intuitive and effective.

Step 6: Add Voiceover
In the import video step, we already know that iMovie can import music files on your iPhone/iPad or add sound effects. In addition, we can also add voiceover to your movie conveniently. To do so, tap the Add Media button, then tap Voiceover. When you’re ready, tap Record. After a 3-second countdown, recording begins. After that, you can either Cancel, Retake, Review or accept the recording. Each added audio will be distinguished by a different color (the song file is green, the recording file is purple, the sound effect is blue). Different from the video, multiple sound tracks can be added at the same time. Each audio track can set the volume and effect separately.
Step 7: Add Titles
Tap any clip and then tap the “T” text, and the title templates browser will appear. Choose your desired title template and change the texts in the preview window. Each theme will come with 3 title templates (Opening, Middle and Closing). There are two position options for the other title templates. That is Center and Lowser. Once added, a photo or video clip with subtitles will appear on the timeline with a “T” icon in the upper left corner.

Step 8: Export Your Movie
When the video editing is completed, tap Done to go back to the main screen of your iMovie project. Here you can preview your movie to make sure whether it's what you want. Give it a recognized title for management. For exporting, tap the Export button at the bottom to export your movie to your iPhone, upload to YouTube, upload to iCloud, and more.
iMovie supports 4 resolutions up to 1080P. The export speed varies. The higher the quality, the larger the capacity and the longer the encoding time. Trust iMovie, you'll receive high quality movies for sure. It's worthy waiting for the movie encoding complete.

In Conclusion
It's hard to imagine that on a small screen, iMovie will be able to achieve near-professional editing capabilities, using Apple's advanced Multi-Touch technology to create a satisfying movie with simple operations. Although it's hard to compare with the features of Final Cut Pro, it is more than enough for most movie makers. I believe iMovie will bring you a wonderful movie, if you could spend sometime on learning its basic operations.
For Windows Users: Download iMovie for Windows alternative
iMovie for Windows | Download | Privacy Policy | Contact Us | iMovie Blog | Store |
Copyright ©
iMovie For Windows Dot Com. All rights reserved.
Browser compatibility : IE/Firefox/Chrome/Opera/Safari/Maxthon/Netscape