
Getting Started Editing Video with iMovie on Mac
Speaking of choosing video editing software, many people may like to pursue the best and most professional. But I don't think so. Taking iMovie and Final Cut Pro for examples, I use both of them. Without doubt, FCP is more professional. However, I even prefer the intuitive interface and simple workflow of iMovie. In contrast, professional software tend to be more complicated and costly to learn.
iMovie, for most people's video editing needs should be completely sufficient. If you master the skills, it is a pleasant process to switch to Final Cut Pro in the future. Final Cut Pro X mainly provides advanced plug-in support, more color adjustment tools, richer video encoding, external microphone track synchronization and other professional functions. When there is such a demand, you will naturally consider changing software.
On this page, iMovie is the only major character. You'll learn the important iMovie skills here to turn your video to the next level. You're able to directly go to the interested topic by clicking the links below. If you haven't installed iMovie yet, download iMovie from Mac App Store.
For Windows Users: Download iMovie for Windows alternative
> Enhance Video and Audio> Making Green Screen Video
> Smart Use of Title Effects
> Use Map Background
> Add BGM and Remove Audio
> Add Narrations
> Stabilize Shaky Video
> Export High Quality Video
Enhance Video and Audio in iMovie
While making movies, anyone wants that the sound is engaging and the picture is exquisite. These two things can be done easily in iMovie. Just select the material to be optimized in the timeline and click the magic stick button in the upper left corner of the video. This button will also open the automatic color balance, automatic color correction, automatic audio optimization tools.

Use Green/Blue Screen Tool in iMovie
Making a green screen video is also a trick to make your video outstanding. You only need to prepare a piece of green paper or cloth. Then record a green screen video with your phone for using in iMovie.
The principle of the green screen is that iMovie looks for all the green parts and then erases them to reveal the underlying layer. Therefore, you need to put a background clip to the timeline, and put the green screen layer above the background layer.

Then select the green screen layer, click the video overlay settings icon above the video, select "Green/Blue Screen", and it's done. If the green screen is not accurate, you can adjust the softness slider to get the best results.

Similarly, you can also use the Overlay Settings to realize split screen and picture in picture (PIP) effects. Just replace the green screen layer with the picture-in-picture layer.
Smart Use of Title Effects
Many people think that the title effects provided by iMovie are too simple and few to choose from. In fact, many effects are hidden in the title options. In this section, let's look at how to use these title options to implement timestamps, blur and other special effects.
Adding Timestamp to Video
In order to accurately display the video recording time, some people may manually add some texts. Actually, it does not have to be so troublesome. iMovie can do this automatically. You just need to go to the Title tab and choose “Date/Time” template. Voila, iMovie automatically displays the exact time of the video recording and updates it in real time.

Using Effects without Texts
Sometimes, you may only need the title effect instead of the title texts. If so, simply drag the title with your favorite effects into the timeline and delete the texts. By doing so, only the special effects will be displayed. In the image below, I've selected various title templates and deleted the texts. You can see that both effects and blurs are achieved.
Use Map Background
When making a video tour, it's a good idea to use a short animation to show the change from one place to another. iMovie makes this step very simple. Firstly, choose the map you like from the Backgrounds tab and drag it into the timeline.

Next, select the animated travel map in the timeline and click the earth icon in the toolbar to go to the details setting page. There, you're able to choose the map style, and determine the start and end city. Then click the Play button to preview the travel map.
Add BGM and Remove Audio
When making a video, it's boring without background music. Thanks to the huge music library that comes with iMovie, it's extremly easy to find your favorite background music. You just need to step to the Audio tab above the browser. Then choose from iTunes, Sound Effects, and GarageBand. You can find thousands of high quality sound effects and background music.
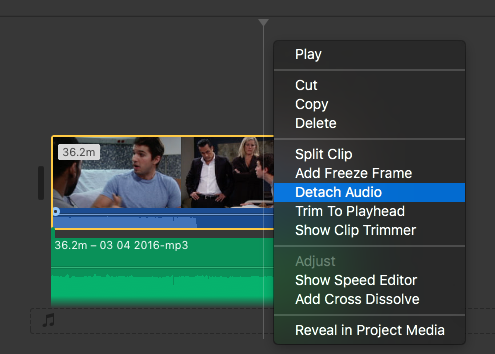
In most cases, you're adding audio to your video. But sometimes you may also need to remove audio completely from your video. For example, your recordings may have a loud noise or you don't like the original background music. To remove audio, first detach audio by right-clicking on the video clip, choose Detach Audio, and then delete the separated audio. It's done.
Here, I'll share two useful tips. The first one is quickly dupliating audio clips. To do so, just hold down the Alt key and drag and drop the selected audio clip. Second, to add fade-in/fade out effect, move the mouse pointer to the circle point at the beginning of the audio track. When the arrows appears, drag it to create the effects.
Add Narrations
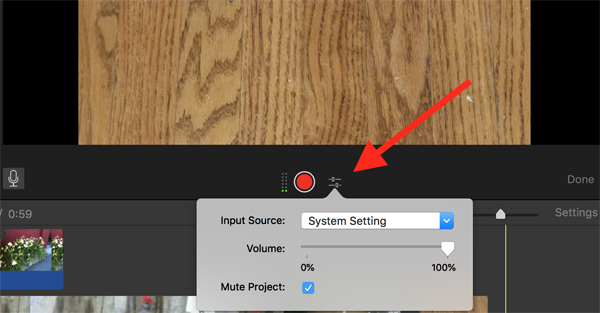
If you often watch video on YouTube, you know that many YouTubers add narrations after completion of their recording. We may call this Post Dubbing which usually guarantees higher audio quality and lower recording costs. We can also use post dubbing in iMovie. iMovie's voiceover feature is very easy to use, first point the mouse where you want the narration to begin. Then click the microphone button to start recording. That's it. If the background sound interferes with your voiceover, you can check "Make Project" checkbox in the Voiceover Options menu. When the recording is completed, the narration will be automatically added to the current position of the playhead.
Stabilize Shaky Video
In my humble opinion, he biggest difference between professional photography and hobbies is the control of picture jitter. In order to avoid jitter, professional photographic equipment is often equipped with various anti-shake methods, such as tripods, rockers, stabilizers and so on.
Therefore, if you want to make your recorded video professional, you must pay attention to the anti-shake methods. Eliminating video jitter includes two time points. The first point is pre-recording, while the other is post production.
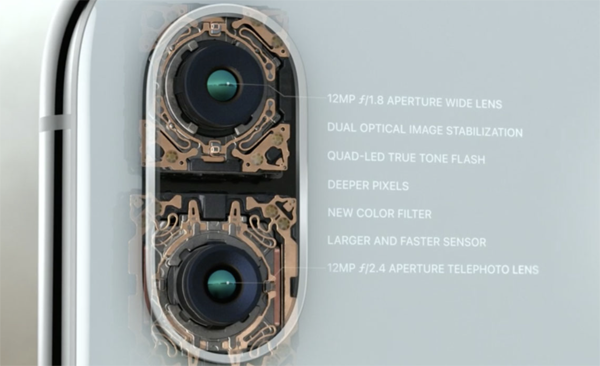
If your recording device is a mobile phone and there is no additional stabilizer, don't worry. Today's mobile phones are often equipped with optical image stabilization and algorithmic anti-shake. The collaboration of these two mechanisms will ensure that the images we get are basically jitter-free.
In addition to optical image stabilization, the second anti-shake mechanism in the phone or camera is the algorithm anti-shake. The principle of this mechanism is very simple. The essence is to analyze the still picture and then cut the edge. The reason for saying it separately is that some machines cannot start the algorithm anti-shake in some machines under 4K recording, because there is not enough picture for the anti-shake algorithm to cut.
If your device supports optical and algorithmic anti-shake when shooting 4K video, then feel free to shoot 4K content. If the anti-shake mechanism cannot be enabled at expected resolution, make sure setting the mechanism to the highest settings that can be enabled by the anti-shake mechanism.

Anti-shake before recording is very important because the post processing is usually not ideal. But if your video has already been filmed, try your best. To do it in iMovie, click on the anti-shake button, check the Stabilize Shaky Video checkbox. You're able to adjust the range according to how shaky your video is. Also check the Fix Rolling Shutter pop-up menu and choose how much rolling shutter correction is applied to the clip, if your video is not in the right situation.
Export High Quality Video
After the video is created, the common next step is to upload it to your favorite video sharing site. In this step, many people may not notice that your video may be compressed twice because it does not meet the website upload requirements. Therethus, the video details and audio parsing examples are greatly reduced. Now let's see how to set up iMovie to avoid the secondary video compression.

In iMovie, click the Share button in the upper right corner and select where you want to share your video. The export menu will pop up. You need to make the following settings to ensure the highest video quality, and avoid secondary compression: set the resolution to 1080p, the quality is adjusted to High, the compression selects the Better quality. If the video site has specific bitrate requirements, use the estimated size to be divided by time to ensure no more than the required bitrate. Then click Export to get started.
In Conclusion
When it comes to choosing video editing software, Final Cut Pro or Premier Pro may come out of their minds. In fact, iMovie may be the best choice. As long as your Mac or iOS device can install iMovie, it's totally free, extremely easy to use and rich of useful features. In this article, we're taking the Mac version for example. We'll publish the iOS version in the near future. Please stay in tune.
For Windows Users: Download iMovie for Windows alternative

iMovie for Windows | Download | Privacy Policy | Contact Us | iMovie Blog | Store |
Copyright ©
iMovie For Windows Dot Com. All rights reserved.
Browser compatibility : IE/Firefox/Chrome/Opera/Safari/Maxthon/Netscape